Friday, June 6, 2008

How2: Install WordPress on a GoDaddy-Hosted Domain


I recently decided to give WordPress a try. I've used Blogger for several blogs and thought it was time to broaden my horizons a bit. I register all my domains through GoDaddy.com and out of convenience, I wanted to host my new WordPress blog (TysTips.com) on GoDaddy as well.

I Googled to figure out how to set up my GoDaddy domain and I was surprised to find that there were numerous posts on the subject, but all had poor or outdated instructions. It turns out that there are a few ways to install WordPress on a GoDaddy domain.

The most simple way to install WordPress on a GoDaddy hosted domain is to use GoDaddy's Hosting Control Center to automatically install WordPress on your hosted account. Here are the steps:

  1. We will assume that you've already purchased your domain name. The Domain I'll be using for this tutorial is TysTips.com
  2. Setup a Linux hosting account (you can use a free or premium hosting account, but it must be a Linux account - Windows hosting accounts don't work with WordPress). My domain names all came with free "economy hosting", and that's what I'll be using for this tutorial.
    1. To Setup a Linux hosting account login to GoDaddy.com and click Hosting & Servers > Hosting Management > My Hosting Account.
    2. You should now see something like this in the center of your screen. I have 18 domain names registered with GoDaddy. Each domain gives me 1 free hosting credit. I've used 2 credits to set up 2 hosting accounts (one says "New Account" and the other says "geektechblog.com" - Note, both are setup as Linux accounts, NOT Windows accounts). This leaves 16 credits left for me to use for free hosting. If you've only registered 1 domain name, you would only see 1 credit available. Click on the "Use Credit" link to setup your free hosting account.
    3. Pick the domain you wish to associate the new hosting account with from the dropdown list of accounts (note, if you only have 1 domain registered this will be filled in for you). Choose the "Free Linux Hosting" radio button. Then click continue.
    4. For some reason, clicking continue brings me back to the previous step (I think this is a bug with GoDaddy). You'll note in the image below that I now have 15 credits (not 16) but there isn't another "New Account" listed. You may have no accounts listed. To fix this hit refresh on your browser to reload the page.
    5. Once you refresh the page you should see the new account. Remember, I had a "New Account" and "geektechblog.com" displaying already, but now I have a 2nd "New Account" that shows up. Click on the "Setup Account" to proceed to the next steps.
    6. Clicking "Setup Account" in the previous step opens the page shown below. There are 6 steps to this part.
      • Step 1: Agree to the license.
      • Step 2: Enter a username and password for the hosting account.
      • Step 3: Confirm the account details.
      • Step 4: Choose PHP 4.x or PHP 5.x (I chose 5.x).
      • Step 5: Choose your Addons (free hosting account's don't have any addons to choose).
      • Step 6: Confirm your choices and click "Finish"
    7. After you've completed the 6 steps above and clicked "Finish" you'll be staring at a page with this "Pending Setup" notification. It takes a while (20minutes?) for the system to complete the setup. Click on "View Account List" to see the status.
    8. You can see below that the new account I just setup (TysTips.com) is pending. The account will say "Setup" like geektechblog.com once everything has finished. Again, it can take 20 minutes or more for the setup process to complete. Grab a soda and check back in 10-20 minutes. Hit refresh on the browser to check the status periodically.
    9. Hit refresh after a few minutes until you see that the status has changed from "Pending Setup" to "Setup". Congratulations! You've just setup your own hosting account with GoDaddy!
  3. Now that you've setup your hosted domain, you can move on to the next step, which is to install WordPress using GoDaddy's Hosting Connection service.
    1. Click on the link for your Domain Name (mine is TysTips.com) to go to the Hosting Control Center.
    2. Click on "Content" > "Go Daddy Hosting Connection"
    3. In GoDaddy's Hosting Connection, click on "Blogs" and then on "WordPress" to begin the WordPress installation. Notice, I've also drawn a red line around the indicators that show which tools work with Linux hosting and which work with Windows hosting, that's why it was so important that you set up a Linux hosting account and not a Windows hosting account.
    4. Once you click on the WordPress link you should be staring at something similar to what's shown below. Click "Install Now" to install WordPress!
    5. Installing WordPress from this point forward is a 4 step process.
      • Step 1 - Select Hosting (click the domain name you want to install WordPress on and click "continue").
      • Step 2 - Setup New Hosting (self explanatory and not pictured)
      • Step 3 - Configure Installation: this step takes some expaining. If you want your page to load directly into your WordPress blog, remove the domain name pictured. Leaving this blank will install WordPress in your root directory. This means your blog will load when you type www.yourdomain.com. If you want to install Wordpress in a sub directory, type the name of the directory in the box (it's pre-populated with "wordpress"). This method will cause your blog to load when you type www.yourdomain.com/wordpress (or whatever name you've given to the sub directory).
      • Step 4: Enter your admin and password info for the site, as well as the email address you'd like to associate with your new WordPress blog. (self explanatory and not pictured).
    6. Once you've finished the 4 steps from above, you'll be directed to a page similar to the one below. Click on "My Applications" to view the status of your installation.
    7. It May take a while for your application to finish installing on the servers.
    8. Click refresh on your browser every few minutes until your status changes to "Installed". At that point your URL should turn into a clickable link. Click the link to go to your newly installed WordPress blog! You should also be able to type this link into any browser to see your blog.
    9. Below you can see the start page of my Ty's Tips blog from www.tystips.com.


Well, that's it! If you followed the steps properly, you should be all set.

A few side notes: If you're using the free "economy hosting" plan through GoDaddy you'll see adds at the top of your new WordPress blog. You can upgrade to paid hosting to remove the adds. Also, if you've previously had your domain name setup on a Cash Parking account, you'll need to redirect that domain to point away from the Cash Parking nameservers and toward the Default Hosted nameservers. Otherwise your new WordPress blog will never show up (call GoDaddy for help).

I hope you've found this post helpful! If so, please consider donating!

Tuesday, May 6, 2008

Steve Jobs’s Grave


Steve Jobs’s Grave, originally uploaded by joeysmith8080.

Thursday, April 24, 2008

How2: Free up hard drive space

A hard drive starts to run slower as it fills up. As technology advances and programs become larger the need to properly manage your HD space becomes increasingly important. This is especially true if you use your computer for multimedia content such as MP3 music files or video files.
Note: it's always a good idea to back up any important files before completing any of the steps below.
Step 1: Visualize your HD Usage
Before you try to figure out where you can eek-out a bit more space on your HD you may find it useful to visualize how your HD space is currently used. There are a couple of really cool programs that help you visualize what types of files are taking up all your precious storage space.

WinDirStat
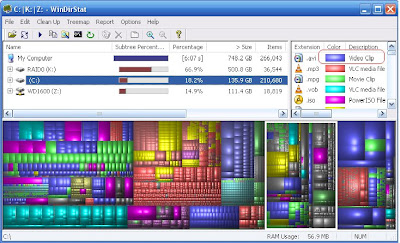
WinDirStat allows you to analyze your HD storage and figure out what's taking up space and where. If you expand the drives, you can see which folders on each drive are taking up space, useful if you have a 10 gig folder of old video footage buried in subfolders that you've forgotten about (like me). Deleting that folder alone can free up alot of space.

You can see from running WinDirStat on my system that I have 3 Drives (K, C, and Z). Each of which have a significant portion devoted to .avi video clips (dark blue). I also have a fare amount of MP3s (red) and .vob files (turquoise). In other words, multimedia content takes up a large portion of my system's HD resources. Maybe I need to delete some of those old songs I don' t ever listen to anymore, or maybe I need to purchase another HD devoted entirely to multimedia content. The point is, WinDirStat makes it easy for you to see what types of files are chewing up your HD space. How you fix it is up to you.

JDiskReport

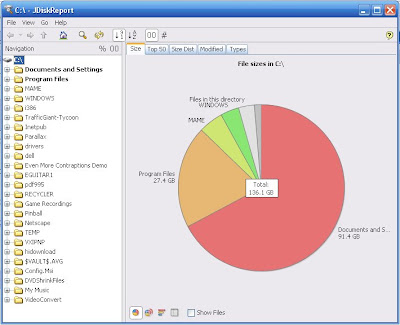
JDiskReport is a similar program with an arguably easier to read pie-chart layout.

Step 2: Cleanup Your Hard Drive:
Once you have a good understanding of how your HD space is being used, the next step is to cleanup old and unused files to free up as much disk space as possible. Windows has a built in cleanup wizard called the Disk Cleanup Utility that does a decent job helping you cleanup your HD. However, there are numerous other options out there for you to utilize.

CCleaner is a good place to start. CCleaner will not only remove unused files from your computer, it can also be used to cleanup your internet history (in case you don't want people snooping into the sites you've visited).

You can also search your system for duplicate files using Duplicate Cleaner and Duplicate File Finder. Unless you have a good reason for the duplicate, delete it. These programs will compare files bit by bit, so you can rest easy that two files with the same name will only be considered duplicates if they are identical in size and composition.

Step 3: Remove unused programs from your system

Computers come bundled with tons of software, much of which none of us ever use, either because it's useless, or because we like to use a different app for a given task. Take Windows Paint for instance, I almost never use it because I like Adobe Photoshop instead. I could uninstall Paint from my system and free up that disk space since I really don't need the program (although, Paint really doesn't take up much space). The point is, if you haven't used a program in a long time (or in some cases, ever), it's a pretty safe bet that you can remove it and reclaim that disk space.

One word of caution! Don't "remove" anything by deleting it's shortcut from the Start Menu or it's folder from within Program Files, make sure to use the Uninstall program that it came with, or use the Windows Add/Remove Programs feature. Otherwise you'll be left with lots of little files that were associated with that program that won't get properly removed, and are thus are simply taking up space.

Removing Programs with Windows Add/Remove Programs

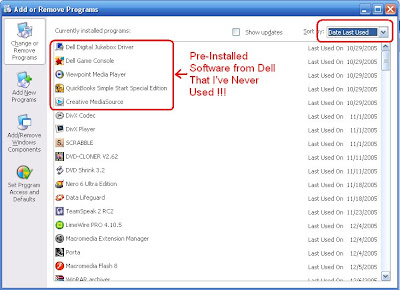
To remove programs properly using Windows go to Add/Remove Programs from within the Windows Control Panel. Remove all the software programs that you haven't touch in the past several months (you can sort by date last used). This could include pre-installed software that came with your system, old games that you've beaten and no longer play, shareware utilities, etc. It's 2008 and I still have pre-installed software on my dell that I've never used since purchasing the computer back in October 2005. Delete!


Other good freeware uninstallers include:

Revo Uninstaller is more than just an uninstaller. it also lets you adjust your autostart program, clean your Windows and browser history, and delete junk files.

Absolute Uninstaller sports a batch uninstalling option, a search function, and the ability to clean up files left behind after you're done uninstalling.

MyUninstaller lets you open an application's installation folder, find registry settings, and features a search option in case you've got a ton of programs to sift through.

Safarp This utility can be installed or run directly from a zip file containing an executable version of Safarp. No installation required.

CCleaner can also be used to uninstall unused programs.

Be sure to check out the rest of Quick fixes for a slow Windows PC.

How2: Defragment your hard drive

Hard drives, by nature, are one of the slowest components in a computer. Other components in your computer, like the CPU or RAM work much faster because they don't have moving parts. A fragmented hard drive (HD) makes your computers slowest component even slower causing an unnecessary data bottleneck. Wikipedia does a good job delving into HD fragmentation here, and the process of defragmentation here - check it out if you're curious about all the dirty details including fun terms like file slack, slack space, and other geekish vocabulary.

For the purposes of this post I'll try to distill things down to what you need to know. Again, simply put, a fragmented HD is a slow HD. Much like a mechanic can "hear" engine trouble, a computer technician can often "hear" a fragmented drive as it churns away, trying to access the data from several different spots on the drive. If your HD has started making audible grinding/churning noises lately, there's a good chance that it's fragmented.

If your computer is running slow, and you suspect fragmentation might be part of the problem, there's hope! There are numerous programs available that help you defragment your HD quickly* and easily. Some are even free!
*"quickly" is somewhat relative, and directly related to the size of your drive and the severity of the fragmentation. An average size drive can take anywhere from hours to days to defragment, so plan accordingly (run the defragmenting program at night or over a weekend, don't start it bright and early 8am on a Monday morning and expect to have your computer back by 9am).
Also, before you defragment, it's a good idea to cleanup the HD by deleting old or unneeded files to help free up space. If your drive is completely full, you won't even be able to defragment it. Most defragmenting programs require 5-10% free space. If you have a 40 gig drive, make sure you have (at least) 2-4 gigs of free space before you try to defragment. Having free space available will also help keep the drive running fast once it's defragmented. A full drive, even if it's defragmented, will run slowly compared to a drive with a bit of free space available.

Now, on to the software. Note* You'll notice that I don't recommend Windows Disk Defragmenter (Windows built-in tool for defragmenting). That's because it's hideously slow and you can't use some programs while it's running. However, once you've defragmented using one of the tools below, you could perform a defragment using Windows Disk Defragmenter to ensure that your system is completely optimized. Using Windows Disk Defragmenter after you've already defragmented will allow the program to run much faster than it would without defragmenting first. Sounds silly, I know.

Free tools:

Defraggler
I'm usually a proponent of free tools, when then work. I've numerous posts on good free tools, including a recent one on free anti-virus options here. For defragmenting I recently discovered Defraggler.

Defraggler is great because it's simple to install and run, and it defragments faster than any other program I've used (and I've used a few over the years). Another nice feature of Defraggler is that it can defragment entire drives, or individual files. Also, I can run Defraggler on my system while working on other tasks and it doesn't slow my system down like other programs I've used. One drawback is the fact that you can't set Defraggler to scan and defragment automatically, which is a nice feature available in other defragmenting programs. It also ins't as full-featured as other defragmenting tools. But if you're looking for a simple, effective solution, Defraggler is your best bet.

Other free tools include:
  1. Auslogics Disk Defrag
  2. PageDefrag is used to defrag your page file, registry, and other Windows system files that many defragmenting tools, including Windows Disk Defragmenter, arent able to defrag (because they are in use while Windows is running). PageDefrag runs during a reboot cycle before Windows loads.
  3. JkDefrag - defrags and "optomizes" by putting larger files (like media files) in the slower parts of the drive, and putting system files like directories essential for system performance in the faster part of the drive. JkDefrag has lots of custom options for an advanced user to play with.
  4. Contig - a command line defrag utility
Non-Free (but good) tools:
  1. PerfectDisk - I'ts not free, but it does a very good job. And you can schedule it to defrag regularly, including during reboots. I originally downloaded the trial version of PerfectDisk 8 because my HD had issues that Windows Disk Defragmenter kept choking on. I was so impressed by how well the program worked that I purchased it. I continued to use PerfectDisk 8 regularly until I discovered Defraggler. Now I use Defraggler regularly (because it's fast and easy) and I use PerfectDisk 8 occasionally to catch anything Degraggler might have missed.
  2. O&O Defrag - This program consistently popped up as a good professional solution during my research on this topic. It may be worth looking into depending on your setup.

In closing, there's a really great article that covers this topic in much greater detail. It's called The Great Defrag Shoutout. It's extremely comprehensive and the author lists his top picks (JkDefrag and PerfectDisk) at the end.

Be sure to check out the rest of Quick fixes for a slow Windows PC.

Quick fixes for a slow Windows PC

I've been asked countless times over the years by friends and family to give them advice on their ailing PC. Typicallly they have a PC that's lived well past it's prime (5+ years old) and would be best put to rest. With prices on new PCs starting at $300 I really struggle with the idea of tuning up old PCs because it can take a lot of work for very little return. However, some people, for reasons of limited income, nostalgia, whatever, refuse to get rid of their aging PC. If you can relate to this type of person, than this blog entry is for you. Or maybe you just purchased yoru shiny new PC and it's already acting up, in that case, this blog entry is also for you.

Quick fixes for a slow Windows PC

  1. Run anti-virus and anti-spyware programs to cleanup your PC
  2. Free up hard drive space
  3. Defragment your hard drive
  4. Upgrade your memory (RAM) (this entry is in draft stage and will be posted soon)
  5. Clean your registry (this entry is in draft stage and will be posted soon)
Note, the tips above are specifically for a Windows XP PC, if you're running Vista, or an older version of Windows (98, ME, NT, 3.1 ... ha!) you may not be able to utilize all the programs listed in the links above. In that case, Google is your friend. Search for similar software appropriate to your OS.
If you have any questions or you'd like to fill me in on something I've missed please feel free to comment!

Thursday, April 10, 2008

Free Anti-Virus Software ... That Works!

There are a number of free resources for those of us who don't want to pay for active antivirus protection programs like Norton or McAffe.

Two of my favorite programs are AVG Anti-virus Free Edition by Grisoft, and TrendMicro's free anti-virus solution dubbed HouseCall.

It's worth noting that both Grisoft and TrendMicro sell a version of their software that isn't free, but I've never needed it. The advantage for paying for the more robust versions include increased tools, and in the case of HouseCall, active protection (the free edition of HouseCall requires the user to initiate the virus scan).

To protect my personal computer I do 3 things:

1: I make sure Windows Update is turned on to automatically install any new security updates.

2: I Browse carefully. I never install anything if I don't know where it came from and I'm suspicious of new web pages or emails that might install viruses and tracking software without my knowledge.

3: I Setup AVG Free to run on a regular basis (nightly for me, while I'm asleep), and I run HouseCall occasionally (monthly or more) to catch anything that AVG Free might have missed.

If for some reason my computer begins to act sluggish during the day, I'll manually run AVG Free or HouseCall (or both) to make sure that I didn't recently pick up a virus.

I've been using this combo for several years and I've never had an issue that AVG Free and/or HouseCall couldn't fix. When I ran AVG Free for the first time a few years ago it discovered more than a hundred suspicious files. After I cleaned up my computer with AVG Free, I ran HouseCall, which discovered a handful of additional files that AVG missed. That's not to say that HouseCall is better than AVG Free. I suspect that I would have had the same results if I had run HouseCall first and AVG second. Any good anti-virus solution is bound to miss a few viruses occasionally.

So you may be asking yourself why I don't just pay for Norton or McAffee. The answer is simple. I've found them to be more cumbersome, less reliable, and more likely to miss-label a file that isn't actually a virus.

Now, if you're planning on using AVG Free or HouseCall to protect your business computers (plural), I'd advise against it. Neither program is designed to operate in that capacity. Also, this solution requires you to be proactive about your computers protection. It also requires you to have sufficient knowledge of your computer to be able to realize when it's not operating normally or running at a sluggish pace. The only way to do that effectively is to be very familiar with your computer and it's quirks. This would be much harder in a business setting where two identical computers can run at drastically different speeds depending on how much free space the computers have, how fragmented the drives are, etc. Also, exposure to multiple employee's tends to be a risk factor for viruses (due to inappropriate browsing, opening non-work related emails, etc).

A shared family computer is also at a higher risk of viruses than a personal computer that has a single responsible user. Therefore you might use a more active anti-virus approach for a family computer used by the kids vs a personal computer used exclusively by you or your spouse in your den or home office.


If you found this entry helpful, please feel free to donate to the GeekTech blog to help keep handy tips and tricks coming!

Recovering Deleted Files

Restoration is a quick and easy data recovery solution by Bryan Kato that allows you to recover deleted files - even after you've emptied your recycle bin!

Download Restoration and recover that missing file in 3 easy steps!

Step 1:
Download the Restoration software, unzip, and save it to your computer, a floppy, or a jump-drive.
NOTE: do not save the file to the drive where you are trying to restore files from. For example - If you will be using Restoration to search for deleted files on your C: drive, install Restoration to anything other than your C: drive (another Hard Drive, floppy, jump-drive, etc). This is to ensure that you don't accidentally write over the file that you are trying to recover.

Step 2:
Open Restoration.exe by double clicking on the Restoration application (it looks like the recycle bin).

Step 3:
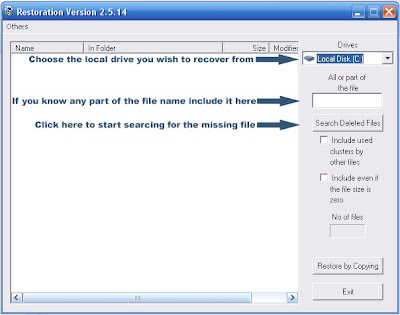
Run the program.

Once you've found the missing file, click "Restore by Copying" and pick a place to save the recovered file.

Congratulations! You've recovered your missing file!


If you found this entry helpful, please feel free to donate to the GeekTech blog to help keep handy tips and tricks coming!